
Whether you’re a brand new builder finding your way around for the first time, or you’re a seasoned citizen builder, you may be overlooking your Default Report Settings. One of the first things I do when adding a new table is a best practice that I guarantee you will save you a lot of time and potential frustration in the future. Below are a few best practices that I recommend to all builders to get a better Quickbase experience.
Where to find the Default Report Settings?
Getting to the settings is obviously step one. They are a bit tricky to find if you’re not familiar with them, so follow these easy steps to find your Default Report Settings.
1. From any table’s homepage, click on “Customize Page” with the furthest right icon:

2. Next, click on the “Default report settings” blue underlined text, it’s a hyperlink and clickable:

Recommended Best Practices
Set Your Default Columns
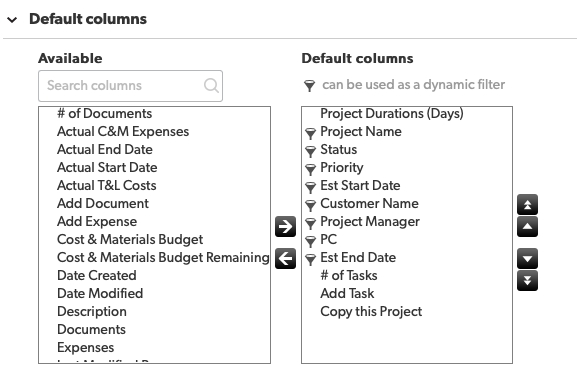
Default columns are very important as they not only display on your Default Report but they are also the starting point for future reports that are created. If you have an excessive amount of fields listed as columns, then you either end up with information overload, or you spend a lot of time removing unnecessary fields with every new report you create. Save time and frustration by getting ahead of this. Trim your columns down to the bare minimum information you need to successfully identify a record in that table.
A lot of people moving from SmartSheets or Excel will often be used to entirely too many columns. This is your opportunity to simplify your life! Remove the clutter and streamline your visual interface.
Set Your Default Columns
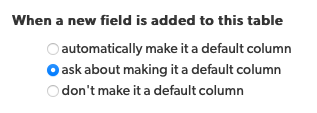
By default, Quickbase has “automatically make it a default column” selected. That means that every time you add a field, it becomes a default column. That means either you have an endless number of columns to sort through, or you’re constantly playing Whack-a-mole, having to remove a column on the default report each time you create it. Nip that in the bud by switching to one of the other options. I recommend setting to: When a new field is added to this table, ask about making it a default column. That will allow you to decide if you want it to be a default when you create it, instead of having to go back and remove it with option 1 or add it with option 2.
There is an exception to this! You will find out that even when you have changed this setting, fields created by a new relationship – both the Add Record button and Report Link field – will be added as default columns. Those will still have to be removed manually which is a small nuisance.
Set Your Default Dynamic Filters
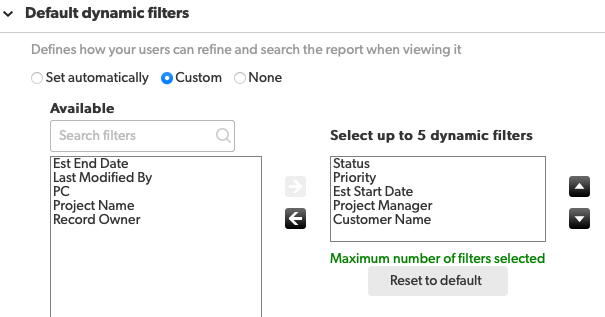
This is another often overlooked setting to adjust. Dynamic Filters are those that show up above your table reports that allow you to easily filter your dataset. By default, it will pick five fields. The problem is, sometimes those fields aren’t important or represent data that you don’t want to filter by. In the above example, think about the Customer Name field. Depending on your industry, each project may be for a single customer, which would make filtering by Customer Name pretty moot. Instead, set these dynamic filters to fields that mean something to your table and its data.
Set Your Default Sort Order

The last recommended tweak is setting how your reports sort by default. The Default Sort Order let’s you control the order in which your records will display. Here there can be many good options such as from low to high by Date Created (most recent first), or something meaningful like the Project Name low to high (alphabetical). Depending on your table’s dataset, pick something that is meaningful to what you should see at the top of your table report.
Final Thoughts
While these settings are often overlooked, they are pretty crucial to using your app efficiently. This is something that I have programmed myself to do with each new table I create. It is a bit time consuming up front, but the time it saves you in the long run is invaluable. Pretty soon it will become second nature and will help you level-up your app building prowess.